Adding multilingual features to a WordPress site can slow down your site. After all, we’re talking about a feature that has profound implications for the WordPress system. If this is really quiet on sites with relatively light content, or a limited number of languages, this can be felt even more when you have thousands of pages available in dozens of different languages.
Just as WordPress offers multilingual support through WordPress plugins, we will do the same to ensure excellent performance to our multilingual WordPress site, use a plugin. All is to choose the right WordPress translation plugin that gets along well with the chosen performance plugin. We have already made this choice for you, let you take by the hand and guide on the way of a powerful multilingual WordPress site.
Which plugins?
The first step for a successful WordPress multilingual site is therefore the pair realized between the WordPress translation plugin and the WordPress cache plugin. We have chosen to use for years the WordPress translation plugin WPML and for the second it will be W3 Total hidden.
We know that the loading time of your multilingual WordPress site is one of the elements of its success. The loading time will have an impact on the engagement of your Internet users, but also on your positioning in the search engines. Before doing anything to boost the performance of your multilingual site, measure its current load time. It’s really easy to do with tools like Google and Pingdom with PageSpeed Insight and Pingdom Tools. You will come back to these tools to measure the loading performance of your website once we have set up and configured W3 Total Cache as it should.
Here is what we are entitled to expect once we have implemented performance improvement on your WordPress site:
- Decrease the time needed to load your site. This will provide a better user experience to all of your users, and it will mechanically increase the engagement rate of your readers.
- Improved your positioning in the search engines. This is true for two reasons. Google favors lightweight sites that load below the 3-second mark. Google’s robot has a quota to browse your site. The lighter your pages are, the more it reads and indexes them by the way.
- Decrease machine resources needed to load your site. This will allow you to either support a larger load with the same server or change WordPress hosting to switch to a lighter solution so less expensive.
Contents
This guide is a bit long, we cut it in several parts to facilitate your reading.
To start well
Configure multilingual page caching
Enable CSS and JS minification
Use a WordPress CDN
Find help
Feel free to place the link of this article directly in your favorites. This will allow you to proceed step by step, and return to this guide when needed. Comments are also present to help you.
To start well
Before going further, is the design of your site finalized and all its texts are well translated? If the answer is no, then we stop there. We definitely put this page in his favorites and we finalize his site before wanting to activate a plugin caching and minifaction on his site.
Ok so normally, your site is fully finished is only waiting for this boost that you are promised so much. If you are the developer or manager of your WordPress site, make sure you have installed and activated W3 Total Cache Nothing extraordinary for now, it’s as with all other WordPress plugins. In addition, make sure you have installed WPML and all the modules that interest you.
Configure W3 Total Cache for a multilingual WordPress site
Install and activate is a breeze. Go to Extensions – & gt; Add and do a search on W3 Total Cache. Just click on the installation button that comes to you. The installation should be fast but it depends on the connection of your web server. Once the installation is complete, simply click on the Activate button to make it available on your WordPress site.
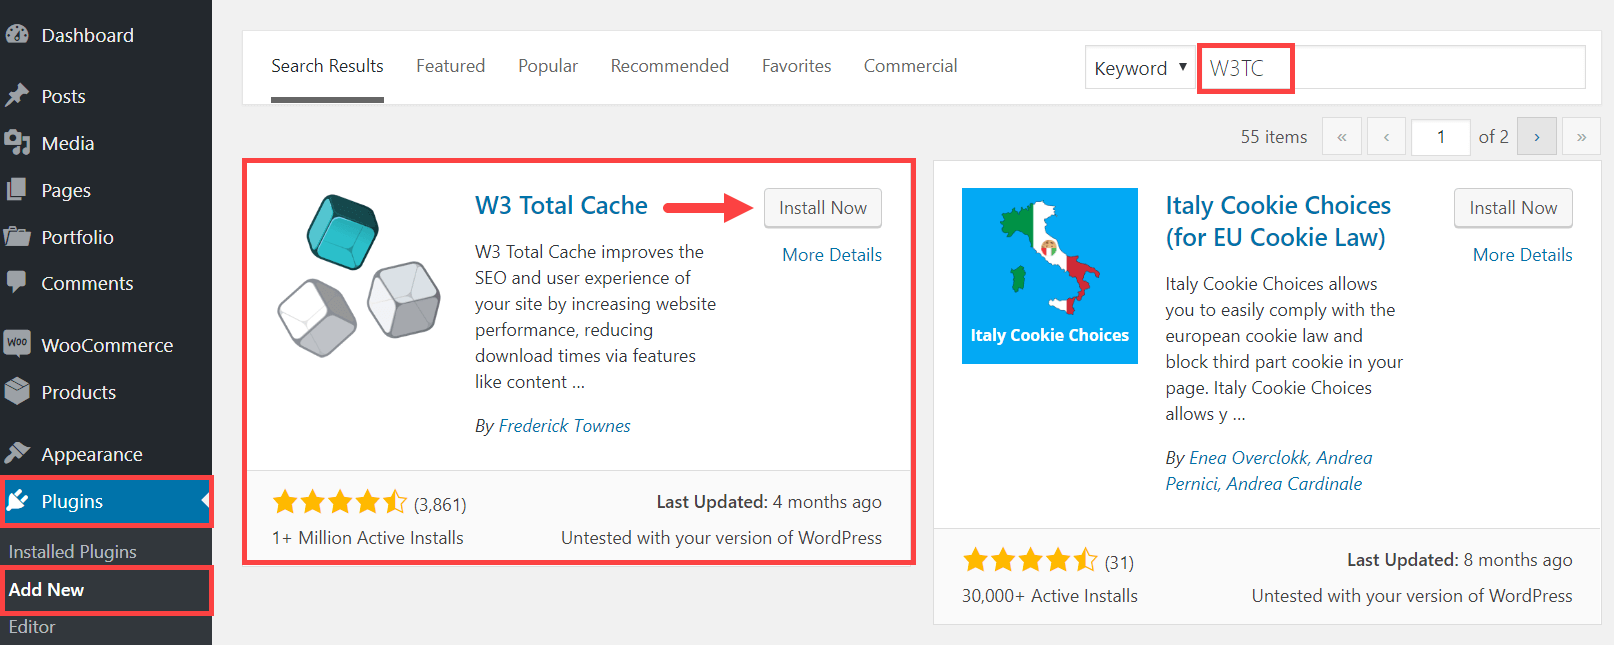
Enabling W3 Total Cache is the first step, we now need to properly configure it to make it fully compatible with our WordPress translation plugin. Offering us the best of both worlds.
Configuring multilingual page caching
Optimization involves acting a minimum for maximum results. When talking about increasing the performance of a multilingual WordPress site, the first optimization is the caching of all pages of your WordPress site. The caching of pages is one of the biggest elements of optimization because it will come at the same time influence the size of the page that will be sent on the network of networks and therefore on its speed of loading, but also on the server load necessary to generate a dynamic page. The caching of keeping the result of a dynamic page at its first call to serve a static copy from the second consultation of the said page.
Enabling caching of pages with W3 Total Cache is simple.
- With the W3 Total Cache plugin enabled, you have the new Performance entry on your WordPress admin interface. Choose General Setting and find the Page Cache part. Enable page caching, and do not forget to save your changes.
 Different caching methods are available. Some will be accessible only if you have chosen the right host. It can happen that the caching of pages slow down your WordPress site. And yes, it may be the opposite of what is expected. So, test the various methods proposed to choose the one that corresponds to the best optimization possible according to your actual configuration.
 - It remains to make sure to customize the general behavior of this caching. The setting of this behavior is divided into five distinct sections. You can see them by going to the Page Cache part of the Performance entry.
- In the General section, take a look at the screenshot below or take note.
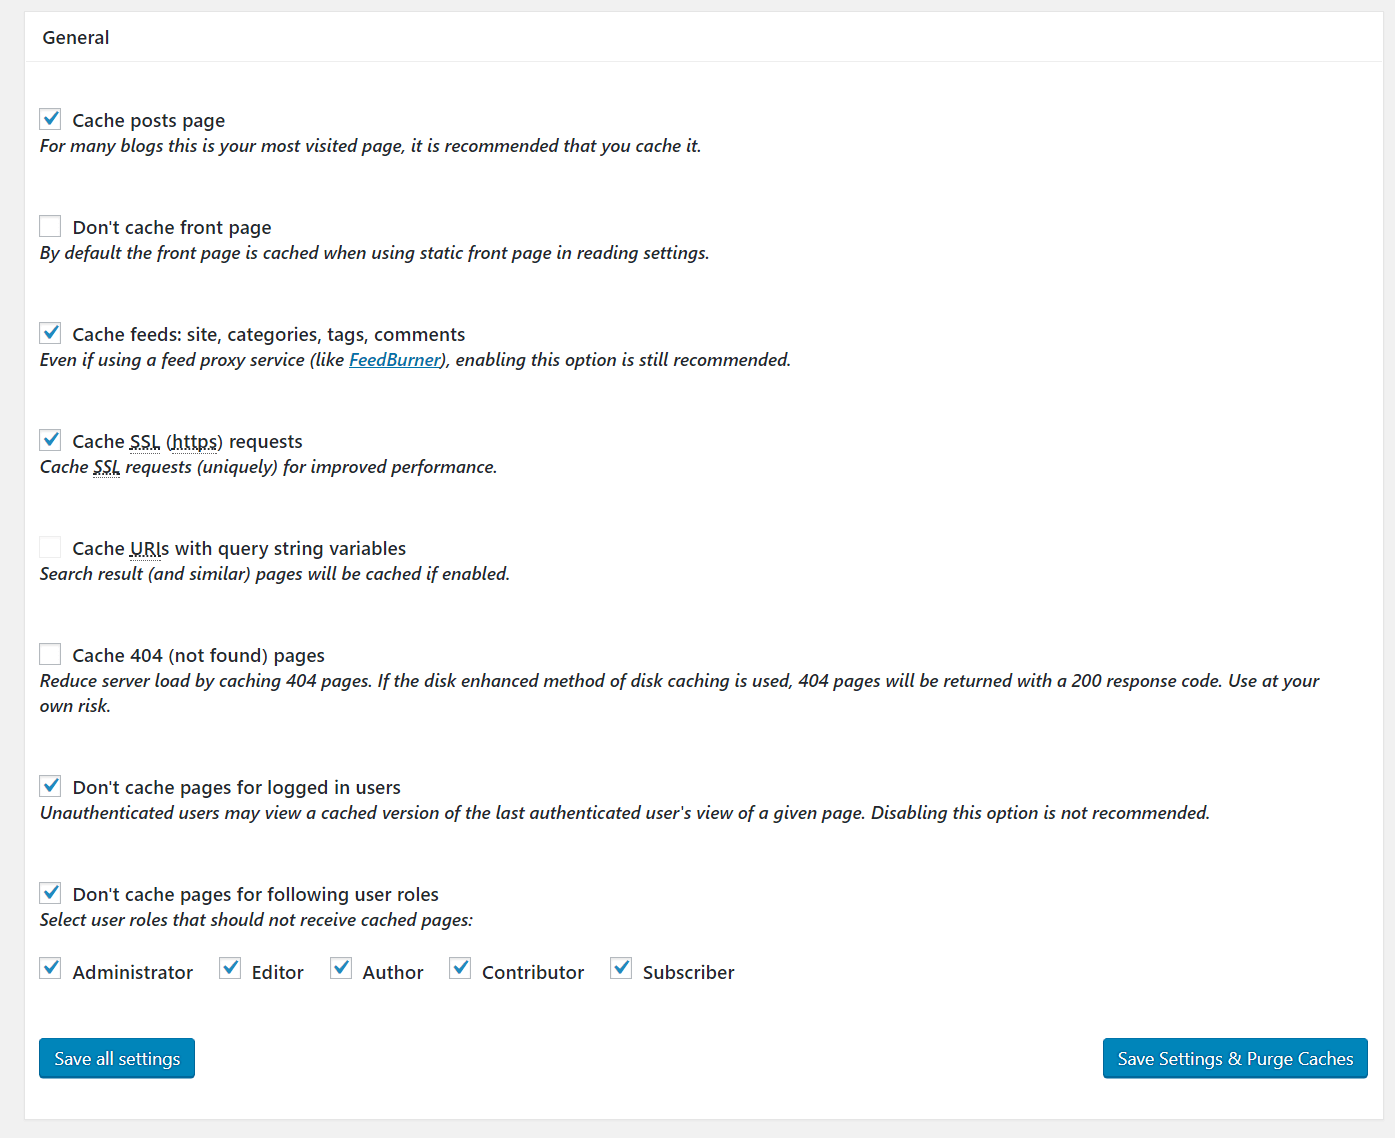
- Activate : Cache posts page, cache feeds, Cache SSL, Don’t cache pages for logged in users.
- Don’t Activate : Don’t cache front page, Cache URIs with query string variables, Cache 404 (not found) pages.
- NWe recommend that you leave all other defaults, such as for Aliases, Cache Preload, Advanced, and Purge Policy. Note that if There are some concerns with cache fills, so take a look at the Purge Policy section.
- In the General section, take a look at the screenshot below or take note.
We’re done with caching pages. Do not forget to save your changes. IF that tells you, go to your site, and have fun doing it. From the second pass, you should feel the difference. Do not hesitate to start measuring the different performances encountered by your website with the tools we talked about in the introduction.
Enable CSS and JS minification
You are not unaware that WordPress is PHP but also a lot of CSS and JavaScript. It will be found everywhere, either in the WordPress theme that you use or the different plugins that work on your WordPress site. The idea here is to both lighten the work of the web browser by limiting the number of queries and lighten the weight of the files. In order to limit the number of requests to the server, the CSS and JS files are combined to form a single file. The files are also minified, which means that all unnecessary code is removed from the CSS and JS files.
To make sure that the CSS and JS minification goes smoothly on your multilingual WordPress site, just follow these steps:
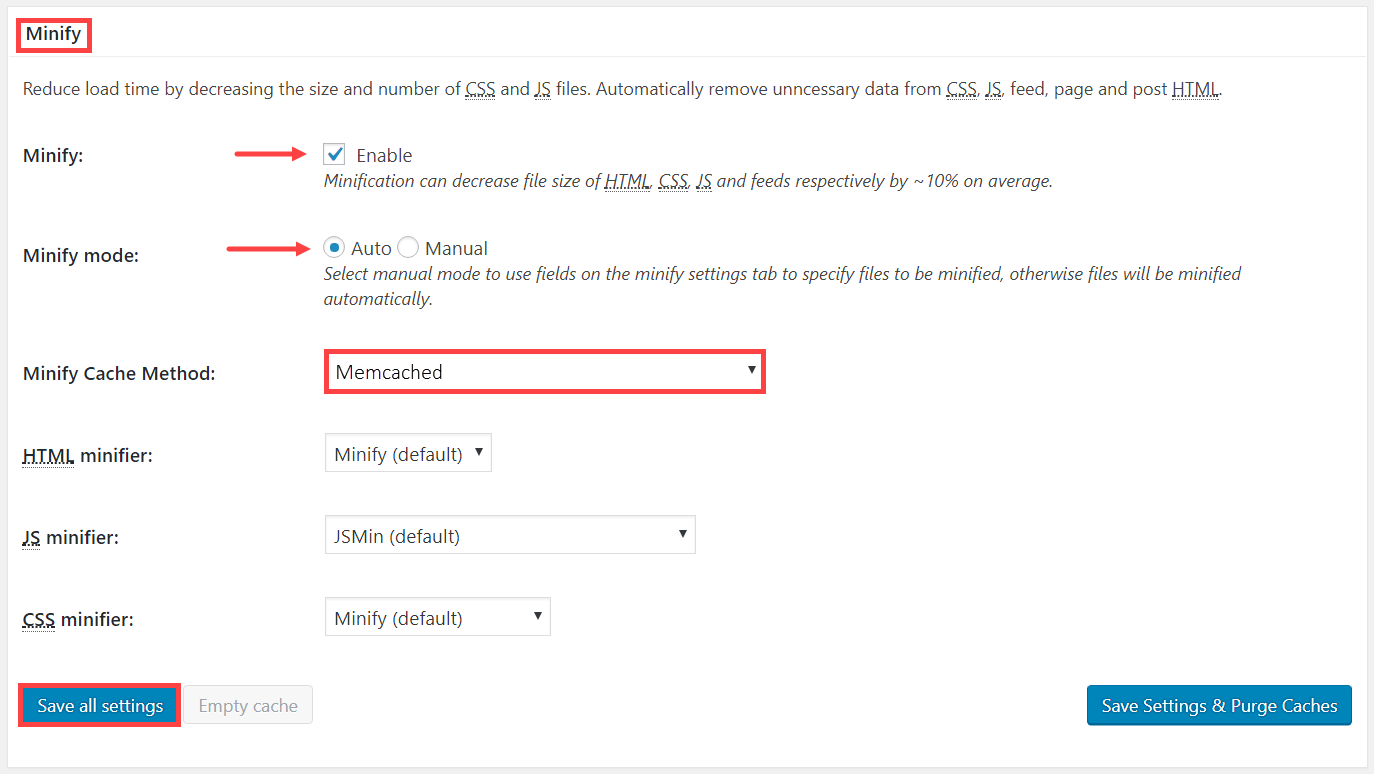
- Go to the tab Performance – & gt; General Setting of your WordPress admin interface. Then find the Minify part. All you need to do is enable it and change the minification settings to automatic and use the method for the minification cache to Memcached. Do not forget to save your changes.
- We will now proceed to the custom configuration of the minification system used by W3 Total Cache. To do this, go to the tab Performance – & gt; Minify. You will see again that the page is divided into five different parts.
- For the General part, leave the default settings by clicking Save.
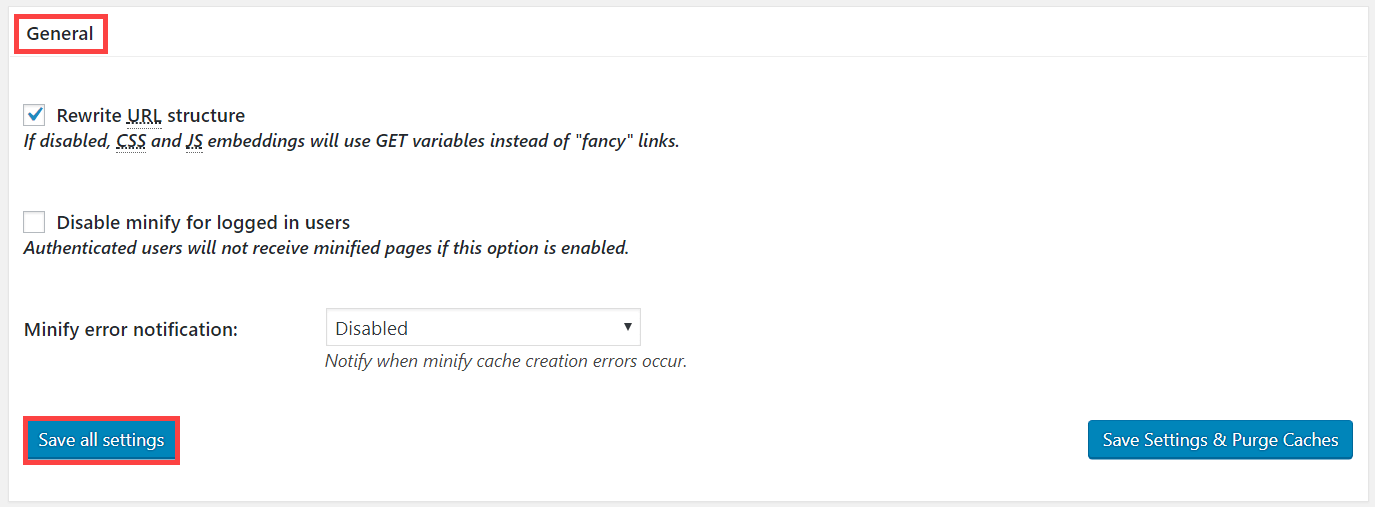
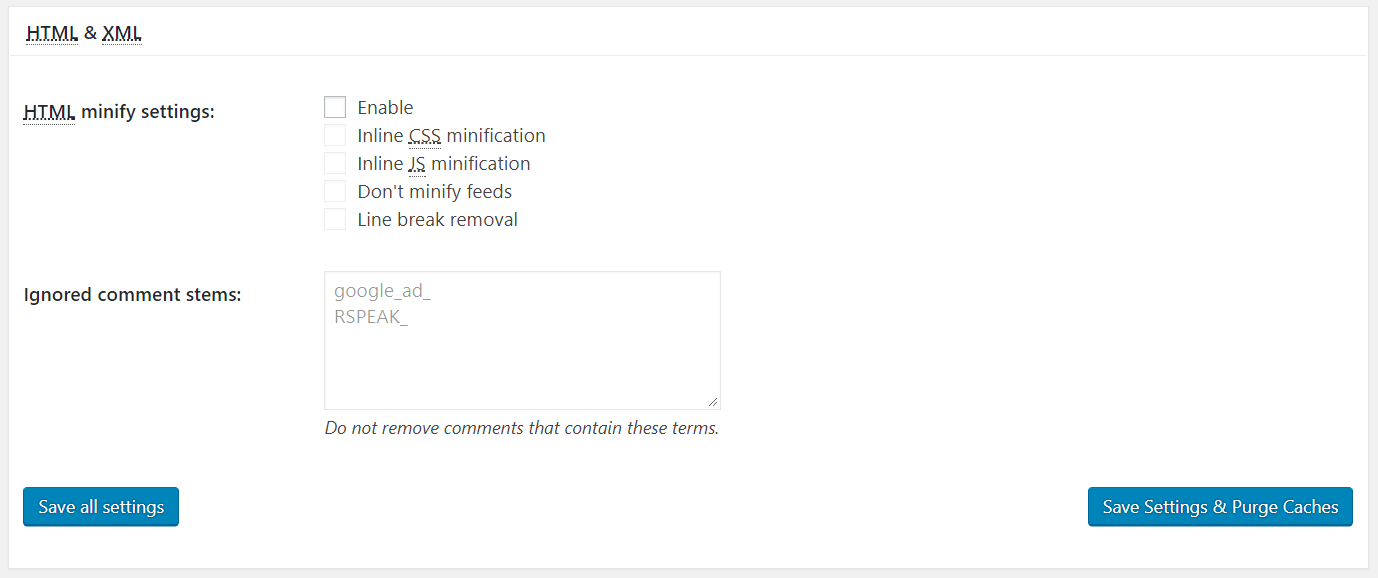
- The same goes for the XML and HTML part
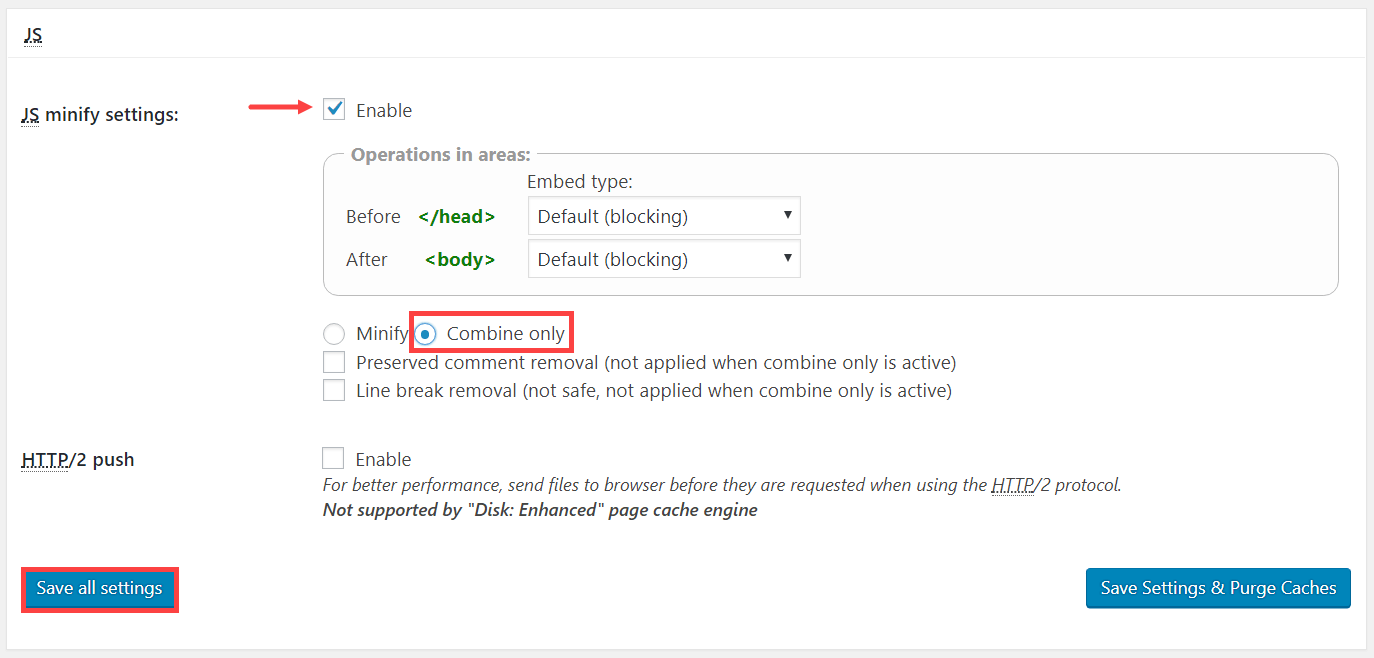
- In the JS part, we are going to do a little something. We will enable the merge of JS files. This is where we tell W3 Total Cache to make only one file of all the JavaScript files that can send our WordPress site. You must therefore click on Combine only . And we always click on Save to save our changes.
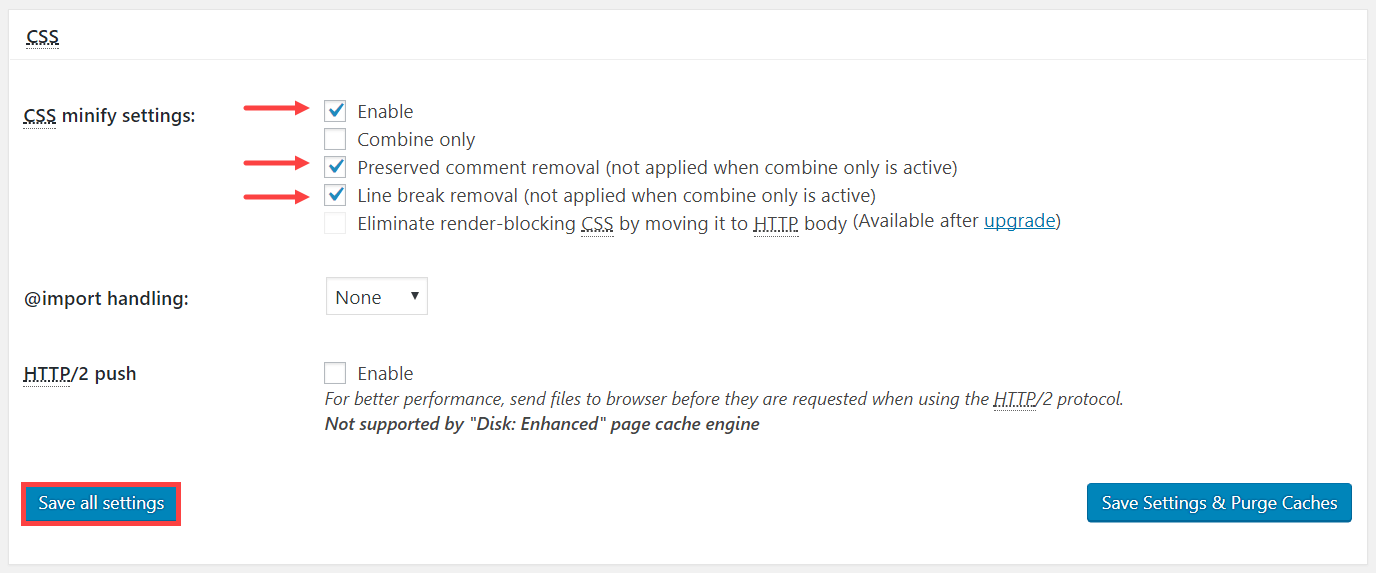
- For the CSS part, we will be a little more precise. We need to activate three different parts that are activating the plugin itself, do not remove comments and enable the removal of carriage return characters.
- Regarding the Advanced part, we advise you to leave it alone for now. Nothing prevents you from taking a look. Be sure to note the settings that work well before you change;)
- It is so much to consider the messages we send W3 Total Cache with each change. Click Empty the cache and have a look at your website 🙂
- For the General part, leave the default settings by clicking Save.
At this point, you should immediately see if the changes work well on your WordPress site. It can happen that the minification lead to errors, which themselves lead to the WordPress white page syndrome . If this is the case, simply turn off feature by function to find where the problem lies with your theme / plugin and W3 Total Cache.
Use the services of your CDN WordPress
Now that we have optimized our multilingual site with W3 Total Cache, it is still possible to do one thing with the latter. For that, you need a CDN WordPress . A CDN is a network of servers spread around the world, whose purpose is to provide a copy of your site closer to where the user is who asks to read one of the pages of your WordPress site.
Like your web hosting, the CDN part is provided by a third party provider. Sometimes your web host offers it at the same time, but it is still quite rare.
Activating a CDN service on your WordPress site will give the impression that your site is loading faster, for a greatly reduced server load. Once you’ve compared the CDN WordPress and made your choice, activating through W3 Total Cache is done as follows:
- Direction tab Performance – & gt; CDN. In the General section, avoid changing anything, and save. Everything.
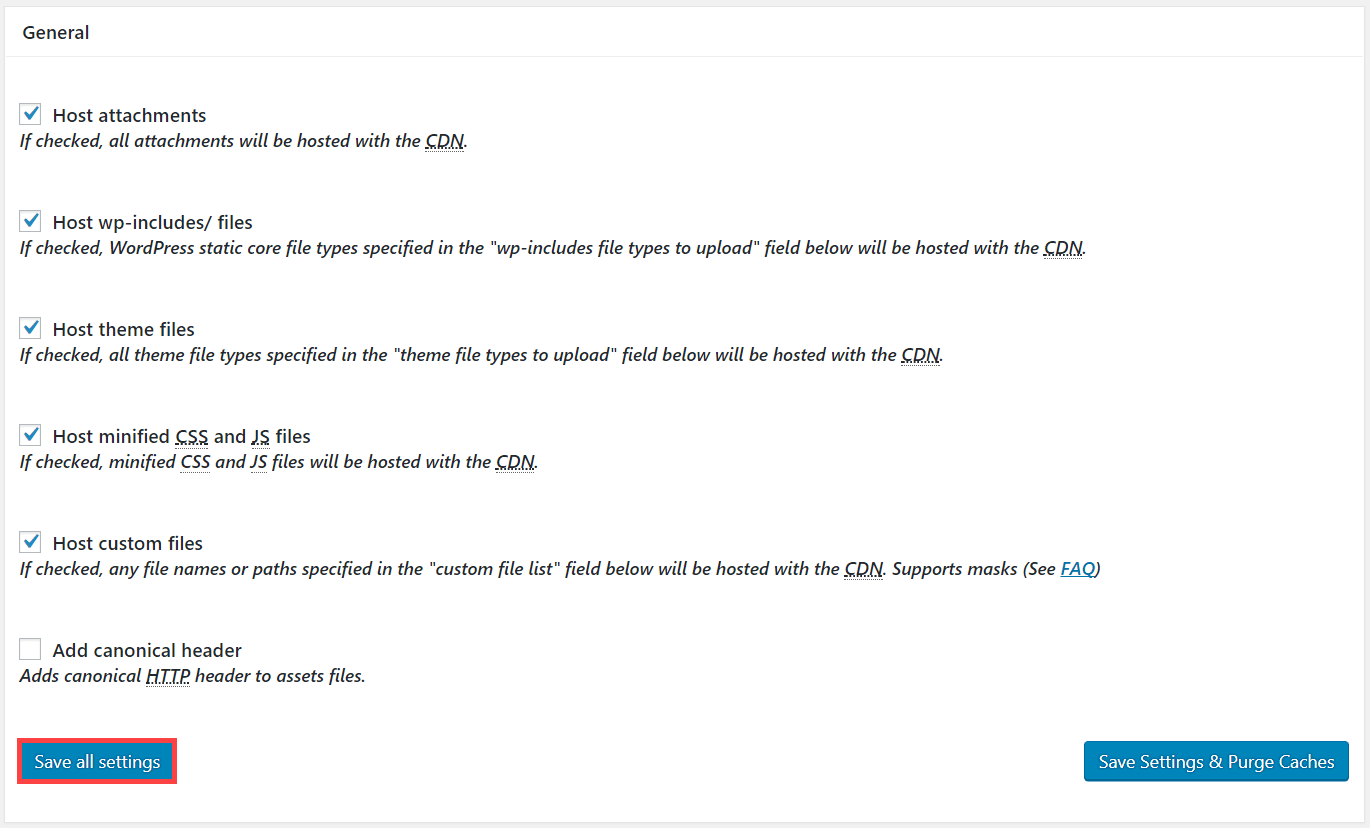 If you see a message that looks like the screenshot below, then click the unsuccessful transfer queue button and restart the process.
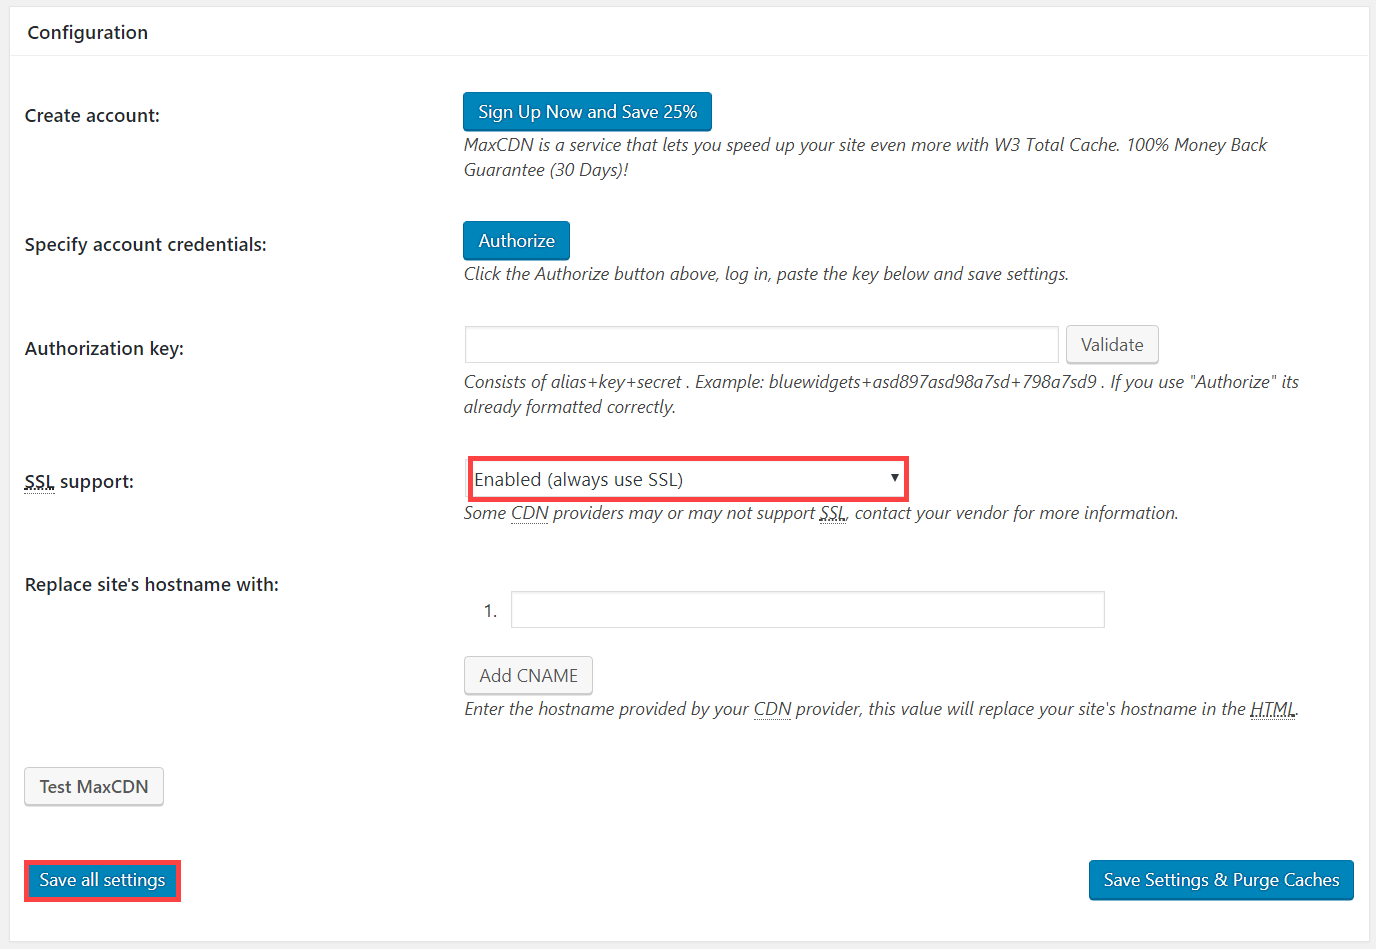
- In the part Configuration indicate the particularities of your CDN. Remember to enable SSL by checking Enabled (always use SSL) and save everything.
- Leave the Advanced part as it is right now. You can have fun later 🙂
Find help
Having a configuration problem with W3 Total Cache and WPML? Do not hesitate to get in touch through the forum, it is great and they are very responsive.
More multilingual WordPress guides
These different guides on multilingual WordPress should also interest you. You can also find all our guides in the section Multilingual WordPress Guides from wp-multilingual.com
Multilingual WordPress Guides
[su_subpages p=”673″]
Multilingual Compatible Plugin Guides
[su_subpages p=”695″]
Multilingual Compatible Themes Guides
[su_subpages p=”718″]